
Among the athletes expected to benefit the most from Plyometric Training are basketball players, volleyball players, tennis players, squash players and track and field stars. All of these codes demand at least one of two things during training and competition.
It is either the athletes competing in these sports are trying to jump higher or produce quick bursts of speed over a sustained period. In many instances both facets are important in equal measure.
Among the most compelling features of these exercises is that they are relatively simple in nature.
In addition, they can be performed with no additional equipment most of the time. Usually body weight is enough to produce a full and results-driven workout.
However, for those seeking an additional challenge, which we imagine applies to many of you reading this, there are opportunities to evolve and invent with the addition of some form of weight resistance.
Finally, we will say that plyometrics exercises are more likely than most to produce the outstanding results that you seek. There are far too many other exercises out there that promise a great deal and underproduce. Plyometrics are the exact opposite to that!
What Are Plyometrics?
A key component of Plyometrics training is that all of the associated exercises are performed with the primary objective of increasing speed, strength, and jump height.
Plyometrics are the most effective form of jump training, because they help burn body fat, increase muscle mass, strength and your capacity to store and release the explosive power required to increase your strength, speed and the height of your vertical jump.
All plyometric exercises are performed at a high intensity, which means that when done right, they produce the best possible results in a very short space of time.
Among the more common workouts are squat jumps, tuck jumps, box jumps, pike jumps and variations of jump rope training.
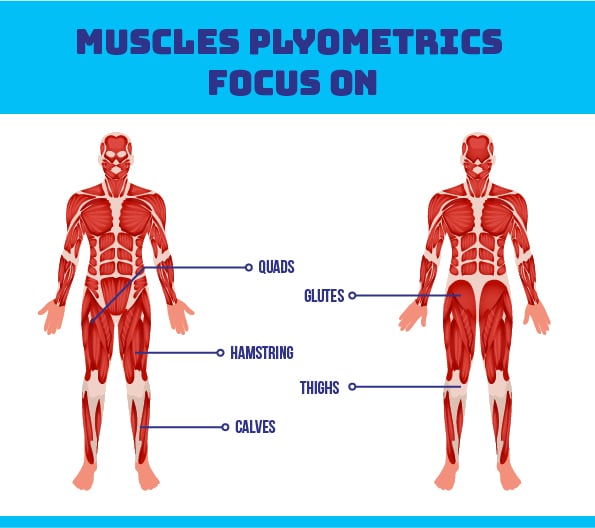
Which Muscles Do plyometrics Focus On?
The vast majority of plyometrics workouts involve some form of jumping or hopping.
It therefore stands to reason that most of these exercises will help you focus most of your attention on muscle groups in the legs, which all play a prominent role in the jump motion.
They include the glutes, calves, thighs, quads and hamstrings.
There are many plyometrics workouts that are also of tremendous benefit to the upper body and in this context the lower back, the abdominal core, the chest, the arms and shoulder muscles all receive a substantial workout.
However, these are all secondary outcomes of plyometrics and sometimes they are just the byproduct of what we would call a full body workout.
Important Information About The Training

1- Warming Up
Before performing any training of this nature you need to stretch the muscles that are most associated with the jump motion, so that you increase their range of motion.
Abductor Stretch:
Started in a static position, with the feet just beyond hip-width apart. You then lean to one side of your body, flexing one of your legs while creating a bridge with the other leg.
Quadriceps Stretch:
Performed by balancing your body on a partner’s shoulder, a wall or a post. You then pick up one leg and flex it backwards until the heels are touching the buttocks,
Glutes Stretch:
Performed from a sedentary position, with both legs stretched out, You then pull the one knee up and plant your foot on the other side of the stretched out leg.
Flexor Stretch:
Performed by lying down on your side, before flexing your top leg backwards, with the heels edging towards the buttocks.
Hamstring Stretch:
Performed by finding an elevated surface and lifting one of your legs and balancing it on that surface. The foot should be rested on the heels, with the leg fully stretched out
Calf Muscle Stretch:
Performed by leaning all of your body weight against a wall, a training partner or a wall. Plant one foot slightly in front of you and allow it to flex a little. Then place one leg behind you and straighten it.
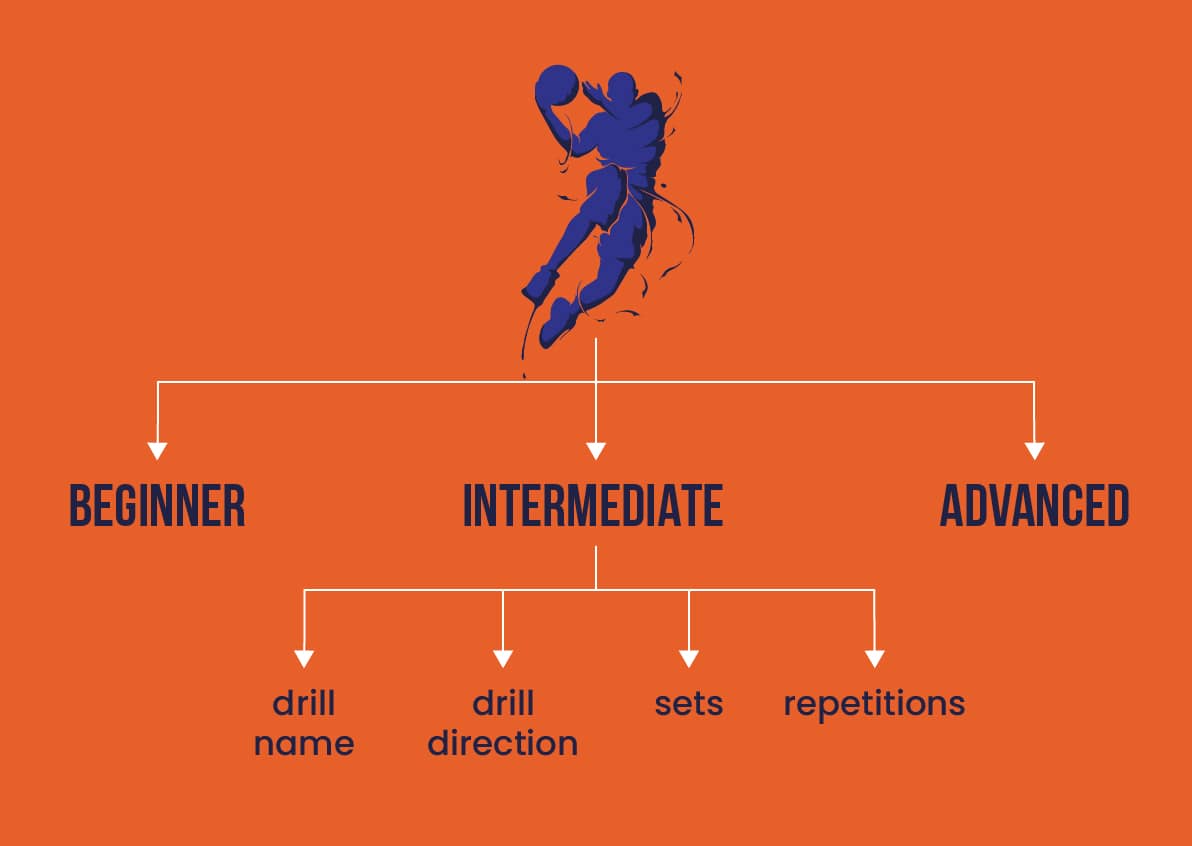
2- Phases
The number of foot or hand contacts you make generally determines the phase of training that you fall into. Each phase of the training program we have provided includes both lower and upper body plyometrics.
Beginner Phase:
Between 80-100 Foot Contacts per Week. During the course of your first two weeks of training, which cover this phase, you should gradually increase the number of foot contacts you make by about 10 percent.
Intermediate Phase:
Between 100-120 Foot Contacts per Week. During the intermediate phase, which will take you from week 3-5, you should gradually increase the amount of work that you do by up to 10 percent.
Advanced Phase:
Between 120-140 Foot Contacts per Week. During the advanced phase of your workout, you should increase the amount of work you do by an additional 10 percent. That will carry you through from week 6-8 of your training program.
3- Frequency
Beginners should never perform more than three plyometrics sessions per week. It is also mandatory to rest for 48 hours at a time.
Intermediates should do four sessions per week. None of these sessions should be consecutive though. In order to make up for the recovery time you will lose, by training four times a week, you should reduce the volume of your workout for the next week by 50 percent. Once you have recovered, you can then revert back to a regular intermediate workout for a full week again.
Advanced athletes are expected to train four times per week. To compensate for a loss of recovery time, you must reduce your workload for the next cycle of training before reverting to the usual regimen. None of those sessions should be on consecutive days either.
It is also important to note that you should not be performing plyometrics exercises in isolation either.
If you are a Basketball Player, for example, an effort should always be made to incorporate some level of skills and endurance training in your workout sessions. Weight Lifting and Body Weight Training should not be treated as some afterthought either.
Most plyometrics programs - whether they be for Beginners, the Lower Body or even the Upper Body - will produce outstanding, tangible results within a period of just eight weeks.
When you perform the 12 exercises that we have recommended here, you can expect to see outstanding results in eight weeks.
12 Best Plyometric Exercises For Strength, Speed, and Jumping
- Beginner Plyometrics Workout - Phase 1 (1-2 Weeks)
1- Drill Name: Jump Squats (Lower Body)
You perform Jump Squats to target your buttocks, hips, thighs and to a lesser degree the calves. They also make you a more agile athlete.
Reps: 5 Reps per Set
Sets: 4 Sets per session
Rest Intervals: 30 Seconds
2- Drill Name: Split Lunges (Lower Body)
You perform Split Lunges to target the glutes, hamstrings and the quads.
Reps: 6 Reps for each side. 12 Reps in total
Sets: 4 Sets per session
Rest Intervals: 60-second breaks between each side
3- Drill Name: Plank Jacks (Upper Body)
You perform Plank Jacks to help strengthen the abdominal core. They are also an outstanding cardio exercise, which is also useful for those conducting jump training.
Reps: Perform for 60 seconds at a time
Sets: 5 Sets per session
Rest Intervals: 30-second breaks between each Set
4- Drill Name: Plank Side Taps (Upper Body)
You perform Plank Side Taps to increase strength in the shoulders, abdominal core and the arms. The workout for your legs is also something that ought not to be scoffed at.
Reps: 10 Reps on each side
Sets: 4 Sets per session
Rest Intervals: 30-second breaks between each Set
- Intermediate Plyometrics Workout - Phase 2 (3-5 weeks)
5- Drill Name: Box Jumps (Lower Body)
You perform Box Jumps to target the quads, glutes, hamstring and quads. Once you complete a jump training regimen that includes these, you will increase your vertical because you are stronger and faster. You will have more explosive power!
Reps: 20 Reps
Sets: 4 Sets
Rest Intervals: Take a one-minute break between Sets
6- Drill Name: Speed Skaters (Lower Body)
You perform Speed Skaters for a solid cardio workout, combined with the endeavor to increase strength in the lower limbs.
Reps: 60 seconds at a time
Sets: 5 Sets per session
Rest Intervals: Take a 30-second break between Sets
7- Drill Name: Plyometric Push-ups (Upper Body)
You should perform Plyometric Push-ups to produce a solid workout for the chest, shoulders, arms and abdominal core. You also burn body fat at a rate of knots when performing this exercise, while also building your muscle mass, which can be critical to your plans of increasing your strength, speed and vertical.
Reps: 10 Reps per set
Sets: 3 Sets per session
Rest Intervals: 30-second breaks between each Set
8- Drill Name: Plyometric Pull-ups (Upper Body)
You perform Plyometric Pull-ups to target the biceps, the forearms and the back muscles.
Reps: 10 Reps per Set
Sets: 5 Sets per session
Rest Intervals: 30-second breaks between each set
- Advanced Plyometrics Workout - Phase 3 (6-8 weeks)
9- Drill Name: Burpees (Upper Body)
You perform Burpees for a full-body workout, which includes the hips, legs, buttocks, arms, chest, shoulders and abdominal core. They also function as an outstanding option for those seeking a good cardio and aerobic workout.
Reps: 15 Reps per set
Sets: 8 Sets per session
Rest Intervals: Take a 30-second break between sets
10- Drill Name: Frog Squat Jumps (Lower Body)
You perform this drill to increase your explosive power, by targeting the glutes, hamstrings, quads and thighs. When performed at a high intensity this can also be an outstanding way to burn calories rapidly.
Reps: 10 Reps per set
Sets: 4 Sets per session
Rest Intervals: Take a 30-second break in between sets
11- Drill Name: Tuck Jumps (Lower Body)
You perform this drill to improve your explosive power. However, to all intents and purposes this is really a drill performed to achieve a full body workout. You will also shed a lot of body fat when you perform this drill.
Reps: 15 Reps per set
Sets: 4 Sets per session
Rest Intervals: Take a 30-second break in between Sets
12- Drill Name: Thrusters (Upper Body)
When performing this drill you target the glutes, hamstrings, arms, back, abdominal core and shoulders. This, like most jump training workouts, is a strength workout.
Reps: 10 Reps per Set
Sets: 4 Sets per session
Rest Intervals: Take a 60-second break between Sets
Safety and Precautions
These sets of workouts naturally need to be performed at a high intensity, but because they are generally fun and rewarding workouts to perform, there is also that risk or temptation to do too much.
That temptation is compounded by the desire to produce even better results than those which have already been promised, in what is already a short period of time.
Something which does not get nearly the amount of attention deserved is the quality of the Jumping Shoes that you use for your training. You want shoes that provide traction. You want shoes that are light, you want shoes that provide good arch support and you want shoes that help absorb impact (particularly when you land).
You also want shoes that have sufficient ventilation properties and finally you want shoes that allow for an almost perfect fit. There are few things in sport more terrifying than trying to jump in shoes that are either too loose or too tight. If we were to choose for you, the tighter fit might be the better option in the end.
Something else worth noting when pursuing safety with these exercises, revolves around establishing and maintaining the right form when performing these drills.
If you start experiencing more discomfort than usual, there is a distinct possibility that some issues have emerged with your form. With poor form, most of that discomfort - and sometimes outright pain - is likely to be felt in the hip flexors and other joints in the body.
Conclusion
As outstanding as they are, it is also important to note that not everything about plyometrics training is good - although most of it is!
These exercises have been associated with severe muscle pain, although some of that can actually be mitigated by something they call Aquatic-Based Plyometrics. There is more about that elsewhere on these pages.
These exercises have also been associated with increased pain sensitivity. That is to say, that the pain threshold is actually lowered when you perform plyometrics. Your perception of pain is often also heightened, especially after performing these workouts.
Because of the impact that is endured by the body during the performance of this training, your exposure to injury also tends to be increased, especially in areas like the ankles, knees and hips.
Again, there are methods available to help mitigate the consequences of that impact. One way to go about that is by activating your muscles - a subject that we have already tapped on in these pages.
Equally important is the completion of a thorough workout and training program, which prepares your body for what you plan to put it through.
Hey, I’m Aleksandar and I am a Basketball freak! That is why I decided to create this blog. Teaching people How to dunk a basketball and How to Jump Higher in this sport or other related sports that require vertical jumping, is my specialty. If that’s your aim, then you have come to the right place.