

Increasing Your Vertical Jump can become somewhat of an obsession - such is the nature of the professional age. Beyond that though, we just live in a much more competitive world, even at an amateur level.
If you have a good head on your shoulders, it can also become a healthy obsession. We all want to be better at what we do and that is perfectly sensible. However, we sometimes do not have the required clarity on how it is that we will become better. Vertical Jump Testing is one way to get the clarity that you seek.
This blog is a one-stop shop, where you will learn how to piece all of the Vertical Jump Testing elements together.
Why Does Vertical Jump Testing Matter?
Your Vertical Jump Test will tell you what exactly it is that your body can do and what it probably can’t do. You should Test Your Vertical Jump to establish just how much power your body is capable of generating.
Your ability to perform powerfully will enhance your athletic achievement. However, you are unlikely to ever train to run faster or jump higher if you don’t measure and monitor that ability to perform powerfully.
This kind of testing is also important because it provides some critical data on lower limb functionality, especially if you have sustained a muscle joint injury during competition or even during jump training.
All of the movements in your body are ultimately connected in one way or another. The movement one part of the body makes has a bearing on another part of the body. If your lower limbs are unable to produce the power needed to jump higher - if the lower limb functionality is below the basic standard - another part of the body has to compensate for that.
Those muscle and joint compensations can have a long-term and damaging effect on your body, which means that not only will that body fail to heal well enough to jump higher but the exposure to even further and recurring injury also increases.
You cannot make the judgement you need on how much training you can and should do, if you do not have the required data to make that informed decision. In addition, it is only a test of lower limb functionality that can tell you if you are even ready to compete in jumping activities again, let alone train.
Which Sports Benefit The Most From A Vertical Jump Test?
This test offers nothing more than a guide to those who are responsible for recruitment in professional sport.
Even in a sport like basketball, where jumping is a staple activity, having the highest or best vertical jump does not guarantee that you will be an outstanding professional.
Nevertheless, the jump test is used in basketball, gymnastics, volleyball, American football, association football, rugby union, rugby league, Aussie rules and netball.
Basketball and American football are particularly interesting in this context because they both help better define what it means for a sport to benefit from a test like this.
The governing bodies for both sports in the United States perform what is known as a draft, where prospective athletes have their futures determined by a series of tests they need to complete. The vertical jump test is among them.
This is interesting because the draft process for both sports attracts a considerable amount of media and overall public attention. Those drafts help build on the brand of those sports.
Something as simple as a test like this can be a tremendous cash cow in basketball and football - and this is before we touch on the performance benefits.
What You Must Do Before Testing Your Jump?
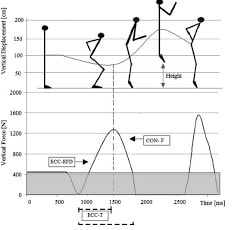
When testing your power and height, there are essentially two aspects that warrant consideration - whether that preparation will benefit you best in the short term or in the long term.
You see, the way you would prepare for a jump in the short term will be different to the way that you prepare for a jump test in the long term.
If you are preparing for the short term, the emphasis is more likely to be on the warm-up and stretching regimen and less on the intensity of the preparation itself.
There are actually a few more layers to peel off the onion here!
Warm-ups will invariably include specific and then non-specific warm-ups. Specific warm-ups center their focus on the activities that you are about to take part in. In the context of this blog, this focus will be on jumping. There is not much room for extensive imagination when doing specific warm-ups for jumping because more often than not, all you will really be doing is some form of counter movement - just at a much lower intensity than you would do for the test itself or in the competitive environment for that matter.
Non-specific warm-ups place more emphasis on the muscle groups that are most likely to be used during the physical activity. Most of these warm-ups will naturally feature some form of stretching, which prepare those muscles for the extensions and contractions of said muscles. In the context of this blog, most of that work will focus on the lower limbs and the hip flexors.
There is now some compelling evidence to suggest that specific warm-ups actually do produce better results when you are trying to Jump Higher.
This extends well beyond just pure physical fitness though. This also has a considerable amount to do with the mind. Elsewhere on this site we talk about the benefits of muscle memory - and that is certainly a part of it - but this also assists with neurological preparation for jumping in general.
What we also already know - and this has been confirmed over and over again during the past half-century - is that warm-ups in general definitely enhance an athlete’s performance when he does eventually conduct an Average Vertical Jump.
If you are preparing for the long term, there will be considerably more emphasis on the more intensive Vertical Jump Training. We are talking about the weight training and Plyometrics that feature so prominently on all of these pages.
There is no reason why the former cannot be in some way incorporated to the warm-up routine though. While you will not be weight lifting as such, offering some form of weight resistance when warming up and stretching can be extremely beneficial.
All of that will have to do with the number of motor units recruited for the jump. More motor units means greater power output and more power will translate into a greater vertical.
So, in conclusion - not only will activity specific warm-ups be more beneficial but specific warm-ups with some weight resistance will be exceedingly beneficial. That is the most efficient and practical way to prepare yourself for a jump test.
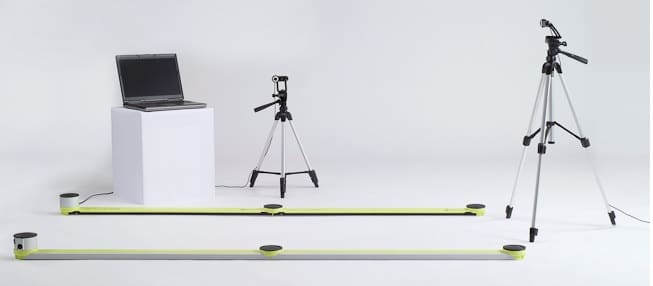
What Equipment Do You Need For These Tests?
Without Technical Equipment:
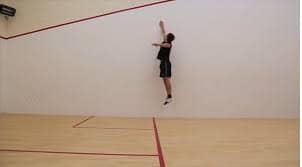
1- Wall Test
Measuring Tape
Chalk or Marking Pen
A Wall
Calculator
The first port of call with the wall test will be to establish what your standing reach is. You do that by standing against the wall and reaching your arm out into the air. You will use the chalk or marking pen to record the highest point you were able to touch.
You will then use the measuring tape to measure how high that is off the surface of the ground, while you are flat-footed.
Once you have established your standing reach, you will then perform a jump test, probably more than once. Each time you will need to touch the wall and leave a marking. Use the chalk to leave a mark with your finger tips, so that you can leave a visible mark on the wall.
You will then use the calculator to establish what the deficit between this and the standing reach is and that will be your vertical jump. Honestly, you do not absolutely need the calculator but it can save some time when conducting this exercise.
2- Vertec Test
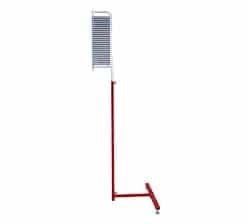
The Vertec Test Kit features:
Steel Frame
Target Vanes
Rest Tool
Weighted Base
The two key components here are the steel frame and target vanes. Using this kit you can test your vertical jump by leaping into the air from a standing position or from a walking or running jump.
As is the case with the wall test, you will first need to establish what your standing reach is by touching one of the vanes on the frame. You will subsequently jump as high as you can and knock off as many of the vanes as you can.
You take the height recorded off your vertical jump and the height recorded for the standing reach to calculate the deficit. Depending on the test kit available, that test can be recorded in inches or centimetres.
The weighted base is important because you do not want to knock that steel frame over when you perform the test.
With Technical Equipment:
3- Just Jump System

The system features:
Handheld Computer
27” x 27” Mat
This is a convenient vertical jump test option because it requires less of you. All you need to do is jump and the machine takes care of everything else. Your job is to stand on a mat, which is connected to the handheld computer.
When you jump into the air, the machine calculates your hang time in relation to when you make contact with the ground. The data recorded from this is usually highly accurate and makes a lot simpler reading than anything you will get from the other testing methods.
4- Vert Jump Rate Monitor
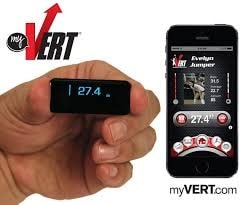
The Vert Jump Rate Monitor features:
Vert App
Sensor
Vert Pocket For Sensor To Slot In
Vert Belt Which Holds Vert Pocket
Velcro Belt
The sensor will be slid into your vert pocket, which will be attached to a vert belt. All of that is then attached to your body, around the wait area. The velcro helps ensure that nothing falls off for the duration of the jump testing.
You will then have an app, which functions as a performance tracker. The beauty about this device is that you don’t just use it for testing a vertical but it can track other aspects of your physical performance while in the heat of competition.
5- iPhone App
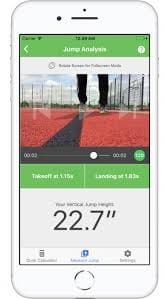
iPhone
What’s My Vertical App
This app actually has multiple functions but chief among them is the capacity to calculate the height of your jump. That calculation is done through video analysis, which is made possible by data recorded on your iPhone camera.
The app measures when you took off from the ground and then records the time at which you landed on the ground. So, once again you are calculating the quality of your hang time, which then determines your power output when you jumped into the air.
It is not an ideal method, as you will need to allow some room for error each way.
6- Infrared Testing
An example of an Infrared system is OptoJump, which features:
Transmitting Bar
Receiving Bar
LED
Data Storage Device
Both the transmitting bar and receiving bar on this device communicate with each other, by sending and receiving information recorded while you are testing for your vertical.
There is an LED on both bars, which helps record and subsequently process that data. The data storage device does what the name suggests it does. Your role in this pantomime is to jump up and land.
The data that is of interest to your machine is the flight time that you record. The transmitting bars record the time at which you took off and then calculate the deficit with the time at which you land.
It would naturally be prudent of you to conduct a series of jumps to produce the best possible and most accurate results.
7- Accelerometer and Linear Encoders
Coordinate Measuring MachineLaser Scanner
Caliper
Tension Tester
Digital Readout Device
This is yet another device which you attach to yourself, normally to a shoelace will work. That device notes the time at which you left the ground. So, that would be your take off. The device will also then help you note the time at which you landed, in relation to that take off.
The goal is to establish how long it was that you were in the air, by analysing the readings. The difficulty with this is that you will actually have to do the calculation yourself, to determine how well you did with the jump test.
When you apply the formula, you can then calculate the distance that you travelled on your way up. It is a really inconvenient method and depending on how skilled and experienced you are, the data obtained from this process could be dodgy. It is a method we would recommend the least.
What Is A Good Jump Score?
rating | men (cm) | women (cm) |
|---|---|---|
Very poor | -21 | -11 |
poor | 21-30 | 11-20 |
below average | 31-40 | 21-30 |
average | 41-50 | 31-40 |
above average | 51-60 | 41-50 |
very good | 61-70 | 51-60 |
excellent | 70+ | 60+ |
When Is The Right Time To Test Your Explosive Power?
1-) Testing Shortly After Warming Up
Earlier in this blog we have already waxed lyrical about warming up and stretching before conducting a Jump Test. All of that preparation would naturally be a complete waste of time if you didn’t actually go through with the test. We would put it to you that the best time to test your jump is within two minutes of completing the warm-up and stretching routine.
2-) Testing When Your Body Is Ready
Having explored warming up and stretching in some detail, we have also established that there is more to preparing for a jump test than would ordinarily meet the eye. There is the short-term preparation - which we have already dealt with - and then there is also the long-term preparation.
If you are testing to qualify for higher sporting honours like the NBA, AFL and NFL, then it would be prudent of you to best prepare your body for that.
There are several training regimens available online that all profess to increase the height of your jump. We think it is therefore only natural that you conduct a test once you have completed one of these exercise programmes - which should include a balance between weight training and plyometrics.
In short, what we are saying here is that you should only ever do a jump exam when you are convinced that your body is ready for maximum power output.
3-) Testing To Monitor Progress
If you adopt and stick to a comprehensive jump training regimen, you need to establish at the outset, what the height of your leap or jump is.
From, there you will need to set yourself a series of soft targets - most jump training programmes will actually provide meaningful guidelines on this. If you are monitoring (by also testing alone the way) your progress, you will also know if you are prepared to take part in that career-defining test for the NBA, AFL or NFL.
4-) Jump Testing For The Season
The best times to test your jump and maximise your results would be somewhere in the warmer months of the year. Because that differs, depending on which hemisphere you are in, we will just say that the best seasons for testing are Spring and Summer.
Not only are warmer conditions likely to produce more conducive atmospheric conditions for jumping but they are also best for the muscle groups that are most associated with jumping.
That is everything from the hamstrings and quads, to the calves. Colder weather is associated with tighter muscles and that increases the prospects of injury, as your range of motion will be a little more limited or restricted. Testing in the autumn or winter is a bit of a waste and potentially counterproductive.
Conclusion
At the heart of it all, this entire concept is all about management. It is about the effective management of your performance schedule, the management of your workout schedule and the management of expectations - both of your expectations and the expectations of those who are in a position to determine your professional sporting future.
You can only manage something if you are knowledgeable about it. This guide is among the more comprehensive around at the moment.
Hey, I’m Aleksandar and I am a Basketball freak! That is why I decided to create this blog. Teaching people How to dunk a basketball and How to Jump Higher in this sport or other related sports that require vertical jumping, is my specialty. If that’s your aim, then you have come to the right place.